Showing posts with label Fruit. Show all posts

Friday, April 24, 2015

Blackberry Upside Down Cake


Blackberry Upside Down Cake
Plump, deep-colored blackberries are a delightful treat. Saw some at Crawford market & thought I should make the most of them whilst they're in season. So here is the simple Upside Down cake. Saw this recipe on net (sorry for not noting down the link) but it was with egg, so turned it into eggless by using curds instead. Cake turned out to be super moist & very very yummy :)

Ingredients (8 servings)
1 1/2 cup fresh blackberries
2 tsp + 1/2 cup sugar
1 cup flour
1/2 tsp baking powder
1/2 tsp baking soda
1/4 tsp salt
1/4 cup unsalted butter, softened
1/4 cup curds or yogurt 
1 tsp vanilla
1 tsp grated lemon peel
1/2 cup buttermilk (see tips)

Method
Preheat oven to 200 C. 
Grease the baking pan with butter & Dust with flour.
Sprinkle 1 tsp of sugar in pan & shake to distribute evenly. 
Arrange blackberries in a single layer in cake pan. 
Sprinkle another 1 tsp sugar on berries.
Place pan with blackberries in oven for 5 minutes to thoroughly warm the berries.
Mix together flour, baking soda, baking powder & salt in a bowl. 
Beat together butter & remaining 1/2 cup sugar in a large bowl until light & fluffy. 
Add vanilla, lemon peel & curds. Mix until just incorporated. 
Add buttermilk & flour alternately, ending with flour & fold.
Spoon batter evenly over berries & all the way to the edge of the pan, smoothing the surface.
Bake in middle of oven for about 30 minutes, until top is golden or till a tester comes out clean. 
Run a thin knife around edge of pan, then invert a large plate over pan & using pot holders to hold plate & pan together tightly, flip cake onto plate. 
Serve cake warm or cool, either with whipped cream or with Vanilla ice-cream or enjoy just like that.

Tips 
* You can easily use more blackberries in same recipe.
* You can use fresh or frozen blackberries (subsitute equal amounts of either).
* Omit salt in recipe if your butter is salted.
* You can avoid lemon peel or can use orange peel instead.
* If you feel batter needs more liquid then add a tbsp of milk. (Make sure milk is added before ending with flour).
* 1/2 cup sugar is enough for batter if you like your cake less sweet otherwise just add 1 tbsp more. (You can sprinkle powdered sugar on the ready cake too later on).
Buttermilk - 1/2 cup milk + 1/2 tsp lemon juice or white vinegar
                       Let it stand for 5 to 10 minutes.
                       Stir before using.


Wednesday, August 27, 2014

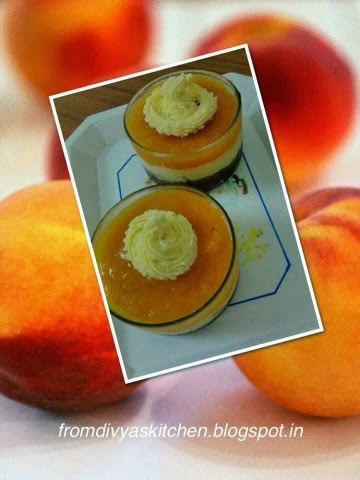
Chocolaty Peach Cheesecake


I mostly avoid using canned fruits but someone gifted me two cans of peaches & I don't like to waste anything so used one of them up in my "mix n match" recipe (took help from my other recipes & few blogs to come up with this version). Result was good, it looked great & tasted yummy. Best is it's an easy recipe.

Ingredients 
For Biscuit Crust
5 Digestive Biscuits
5 Oreo cookies
1 tbsp cocoa powder
2 tbsp sugar syrup (from can)
2 tsp melted butter

For Peach Sauce
4 canned peach halves 
1 tsp Sugar syrup (from can)
1/2 tsp cinnamon powder

For Cheesecake
1 1/2 cup fresh cottage cheese (Without whey)
3/4 cup sugar (according to taste)
Centre cream of Oreo biscuits 
4 peach halves
1/4 tsp vanilla essence 

Method
For Biscuit Crust
Grind the biscuits till coarse. Add cocoa powder, sugar syrup & melted butter &
mix gently.The mixture will resemble dough like.
Grease individual bowls with little butter.
Spread the biscuit mix evenly & gently level the surface using back of spoon.
Refrigerate the bowls for about 15 minutes.

For Peach Sauce
Blend canned peaches & pour in the saucepan.
Stir in sugar syrup & cook over medium heat until thickened.
Remove from heat & mix in cinnamon & keep aside.

For Cheesecake
Put the cottage cheese in a big bowl and using a mixer, churn until it turns slightly fluffy. Or use electric beater.
Add the sugar and churn some more. You will see that the filling has increased in volume.,
Now add in the cream & churn.
Mix 2 peach halves & churn again.
Take out in a bowl & mix the remaining peach halves (after chopping them) in 1/2 of the cream cheese.
Pour the mixture into the cooled crust & using a spatula level the mixture.
Refrigerate for about 15 minutes.
Pour the cooled peach sauce on top of the cream cheese mixture & level it once again.
Place the bowls in the refrigerator to chill overnight.
Ice the remaining cream cheese on top & Serve chilled.

Tips
* I used canned peaches here that were already in sugar syrup, you can easily replace them with fresh peaches - Peal peaches & cook them in sugar. Use as desired. 
* I used sugar syrup from can but you can use powder sugar instead.
* I always make cottage cheese or paneer at home from low fat milk, using curds.
* I used less butter in biscuit crust as syrup helped in binding.
* Do taste cheese cake mixture to adjust sugar.
* This recipe is without gelatine, so it's always better to set in individual cups or bowls. They are easy to serve and looks nice too.
* You can garnish with peach pieces.
* The leftover cream cheese can be used as topping for fruits or as spread on toasts.


Thursday, June 26, 2014

Aam-Papad


Aam papad or Amawat or Mamidi Tandra or Aamsotto is a traditional Indian snack. It is a fruit leather made out of mango pulp mixed with concentrated sugar solution and sun dried. It is a part of the South Indian and North Indian cuisine and is available is numerous varieties all over North India.
So here is the simple recipe of something that reminds us of our childhood  

Ingredients
2 Ripe Mangos
2 tbsp Sugar
2 Cardamom (Peeled)

Method
Wash & peel the mangoes & cut into pieces & blend into purée.
Now sieve the mango paste & mix sugar & ground cardamom.
Take puree in a pan & heat it till it comes to a boil, reduce it a little to semi thickness.
Pour in a greased plate to form a thin layer.
Now keep it in sunlight for 1-2 days. If the day is too sunny then it will be ready in a day otherwise it'll take 2 days.
If it's not ready in a day then you can keep under fan at night, covered with a thin cloth or net.
With the help of a sharp knife try to remove it after it is dry. If you are still not able to remove then it means it's not completely dry & you have to give it some more time.
Once ready you can cut into squares or your desired shape.
Keep it in a air tight container.
But I'm sure after tasting it you cannot stop eating it & finish it very soon 

Variations
Replace cardamom with any of the following combinations-
1) Kala Namak + Kali Mirchi + Ginger powder.
2) Kala Namak + Kali Mirchi + Jeera Powder.
3) Kala Namak + Jeera Powder + Chaat Masala.

Tips
* Adding more kala namak can alter the golden colour of aam papad, you can replace it with white salt.
* If you want to make layers of aam papad like you get in market then, just keep adding layers on dried one & let it dry well in sun. This type will take more time to dry than single layer.
* You can cheat & make layers by just folding the dried sheet in multiple layers.
* If well dried, it can be preserved for months. Depending you can save it from your family 


Friday, February 14, 2014

Chocolate Walnut & Cranberry Cake


Few months ago we shifted to our own house after it's renovation & it was really tiresome to set the house all over again. That's when I thought of making something different...baking always lifts my spirit ;) .... So I searched & found this amazing recipe. Awesome brownie-like cake with lovely chocolate flavor and crunch of cranberries & walnuts. 

Ingredients
1 2/3 cups plain flour (Maida)
1 1/2 cups sugar
3/4 cup cocoa powder
1 1/2 tsp baking powder
1/2 tsp baking soda
1/2 tsp salt
1 cup applesauce 
1/2 cup plain soy milk
1/4 cup olive oil
1 cup sweetened dried cranberries
1/2 cup chopped walnuts, toasted
1 tbsp powdered sugar + pinch of cinnamon powder

Method
Preheat oven to 180ºC.
Combine flour, cocoa, baking powder, baking soda & salt in a large bowl, stirring with a whisk. 
Mix in cranberries & walnuts to the flour.
Combine applesauce, milk, & oil. 
Add sugar and mix well.
Add dry mixture to wet mixture in batches, folding each time lightly.
Pour the batter in greased tin.
Bake for 50 minutes or until edges begin to pull away from sides of pan. Cool on a wire rack. 
Sprinkle with powdered sugar + cinnamon.

Tips
* This recipe makes 1 big (about one kg) cake. So you can half the recipe to get smaller cake.
* I used homemade apple sauce (refer to album "Basic Recipes" for recipe).
* Cow milk can be used instead of soy milk.
* You can use any other vegetable oil in place of olive oil (I like olive best).


Tuesday, October 1, 2013

Apple Sauce


Apple sauce or applesauce is a purée made of apples. It can be made with peeled or unpeeled apples and a variety of spices (commonly cinnamon and allspice). Flavorings or sweeteners such as sugar or honey are also commonly added. Apple sauce is an inexpensive and readily available food. Here is the simple recipe for home made apple sauce.

Ingredients 
3 Apples, peeled, chopped & cored
About 1 cup Water
2 tsp lemon juice 
4 tsp sugar (optional)
1/2 tsp cinnamon (optional)

Method
Place the apples in a pan & pour water.
Bring to a boil; then, cover & reduce heat and simmer for 20 minutes, stirring frequently.
Use a potato masher to mash the apples to your desired consistency.
Add the lemon juice and any sugar or cinnamon that you wish to include.

Tips 
* Can be served as a dessert or used as spread. 
* Apple juice can be used in place of water.
* Taste and then add sugar & if apples are sweet then you can avoid sugar altogether. 
* You can make this and deep freeze for later use.
* It has been suggested that it can substitute for fat (e.g. butter/oil) in baking.
* Read on Wikipedia, that since it is high in pectin apple sauce is a homemade remedy to combat diarrhea.
* Use more than one apple variety, & avoid sour apples like Granny Smith to get the best flavour.

Monday, September 30, 2013

Apple Pie Cake


I love apple & cinnamon combo....& when you bake it...your home smells soooooooo yummy ;) .....  Here is the recipe of a very simple cake with Apples.

Ingredients 
For Cake
1 1/4 cups Flour (OR 1/4 cup whole wheat + 1 cup plane flour)
1/2 cup Granulated Sugar
1/2 tsp Baking Powder
Pinch of Salt
1/4 tsp Cinnamon
1/4 cup Olive Oil, or 1/4 cup unsalted butter softened
1/4 cup Soymilk + 1 tsp Apple Cider Vinegar (or lemon juice)
1 tbsp Cornflour mixed with 1/2 Cup Water
1 tsp Vanilla Essence 
1/2 tbsp Sugar mixed with 1/2 tsp Cinnamon, for topping.

For Apple Pie Filling
3 apples, peeled, cored and thinly sliced
1/4 cup brown sugar
1/4 cup regular sugar
juice of 1/2 lime
1 tsp cinnamon powder
2 tbsp water
1 tbsp cornflour 

Method
For Apple Pie Filling
In a saucepan, place the apples, sugars, lime juice, cinnamon powder & cook on medium heat until the apples are cooked through.
Once the apples are cooked, mix the cornflour with the water to form a paste & add this paste into the apple mixture. 
Cook on low heat until the liquids thicken & form a smooth mixture. 
Keep aside to cool.

For Cake
Preheat oven to 180º C.
Combine all the dry ingredients of the cake & mix well. 
Add all of the liquid ingredients & fold the batter until just combined. 
The batter should be thick & nearly dough-like, as this will prevent the filling from sinking to the bottom of the pan.

How to Proceed
Spread 1/2 of the batter in the bottom of a greased baking dish.
Add apple pie filling evenly over the top.
Spoon the rest of the batter over the top.
Sprinkle with cinnamon sugar mixture.
Bake for 80 to 90 minutes or until a tester comes out clean. Be sure not to under bake. 
Cover the cake with aluminum foil for the last 20-30 minutes to prevent over-browning.
Remove cake from oven and let cool before serving. 
It’s just as good or better the next day.

Tips
* If you are in a hurry, you can use ready made apple pie filling instead of making it fresh.
* You can make the apple pie filling a day before & refrigerate it.
* You can also use normal milk or water instead of the soy milk.
* If using salted butter then avoid adding pinch of salt.
* You can spoon the second layer of batter in clumps, leaving some of the apple filling showing through. (Batter is thick so sometimes it's not easy to spread it evenly).
* This cake really taste better when served warm with vanilla ice-cream.
* Sprinkling sugar & cinnamon gives a beautiful finish to the top so don't forget to do it before baking.

Thursday, August 22, 2013

Danish Pastry


 A Danish pastry, sometimes abbreviated Danish especially in the United States, is of Viennese origin, which has become a specialty of Denmark and neighbouring Scandinavian countries. Here a layer of blueberries is the sweet surprise hidden inside this pretty pastry.

Ingredients
Pastry 
2 cups all-purpose flour
2 teaspoons baking powder
1/2 teaspoon salt
3/4 cup low-fat cottage cheese
1/3 cup sugar
1/3 cup low-fat milk
1/4 cup olive oil
1 teaspoon vanilla extract

Blueberry Filling
4 ounces cream cheese or 1/2 cup
2 tablespoons sugar
1/2 tsp lemon or orange zest (optional)
1/2 tsp vanilla
1/2 cup blueberries (fresh OR frozen)

"Egg Wash"
1 tsp honey
1/2 tsp water

Glaze
1/2 cup confectioners' sugar
2 teaspoons lemon juice

Method
Pastry
Whisk maida, baking powder & salt in a medium bowl.
Puree cottage cheese in a food processor. 
Add sugar, milk, oil & vanilla. Process until smooth. 
Add flour mixture & pulse 4 or 5 times, just until the dough clumps together. 
Turn out onto a lightly floured surface & gently knead several times; do not overwork. 
Press the dough into a disk, dust with flour & wrap in plastic wrap or keep in a covered box. Refrigerate until chilled, at least 30 minutes.

Blueberry Filling
Blend cream cheese & sugar with a food processor or an electric mixer until creamy. 
Blend lemon zest & vanilla. Keep refrigerated till needed.

How to Assemble
Preheat oven to 204°C. 
Cut a piece of foil to fit a large baking tray, spray it with cooking spray. 
On a lightly floured surface, roll the dough into a rectangle about 12 by 16 inches. (Or make small which are easier to handle). 
Roll the dough back over the rolling pin & transfer it to the prepared foil.
Using a sharp knife, make 3-inch-long cuts at 1-inch intervals along each side of the dough at 45° angles. (Check pic).
Spread the cream cheese mixture down the center of the dough, leaving the cut margins & about 1 inch at either end. 
Sprinkle blueberries evenly over the cream cheese mixture.
Fold the top end of the dough over the filling. 
Crisscross the angled strips over the filling to create a braided effect, tucking in the dough at the bottom end. 
Carefully lift the foil at each end and transfer to the baking tray.
Brush honey & water wash.
Bake  the Danish until golden & firm, 20 to 25 minutes. Transfer to a wire rack and let cool slightly.

Glaze
Combine confectioners’ sugar & lemon juice in a small bowl. Stir until smooth. 
Add more lemon juice if the glaze is too thick. 
With a spoon, drizzle the glaze over the Danish. Slice and serve warm or at room temperature.
Tips
* I used 2 cups maida (all-purpose flour) for the dough. But you can use 1 cup all-purpose flour + 1 cup whole-wheat pastry flour.
* You can make the dough a day or two before you plan to bake.
* I used my home made cream cheese for the filling.
* I used orange zest in filling & it gave a lovely flavour to it.
* If while making dough you feel the need of more milk then add a teaspoon at a time, you don't want too soft dough. 
* Original recipe had an egg in filling, which I just ignored ;)
* You can use any leftover filling as spread on your waffles & Rusk or as frosting on cupcakes or just take a spoon & finish it off, it's too yummy :D
* You can use strawberry or any other berry in filling or can replace berries with nuts. 
* You can make these in any shape, it will still be called Danish Pastry ;) 


Cherry Almond Danish
In this recipe I just used cherry filling instead of blueberries. Rest of the recipe remains same & you will get a very beautiful flavor in this one too :)
Cherry Almond Filling
½ cup granulated sugar
¼ cup water
2 cups cherries, stemmed and pitted
2 tsp pure vanilla extract
1/3 cup whole toasted almonds, coarsely chopped
Method
Cherry Almond Filling
Combine the sugar & water in a medium saucepan & bring to a simmer over medium heat. 
Add the cherries, reduce the heat to low and cook for 3 minutes, stirring frequently. 
Remove the pan from the heat, stir in the vanilla extract. 
Cover the pan and let the cherries steep for 1 hour. 
Cool to room temperature. 
At this point the cherries are ready to be used. 
These cherries can be refrigerated for up to 1 week, tightly covered.
How to Assemble
Rest of the recipe is same as in Blueberry Danish :)